In the Drawing lesson, we learned how to send commands to the device to draw shapes and text on a display. While these drawing primitives work well for showing data that fits those requirements, they may not be sufficient for more complex rendering requirements. For example, you might want to draw complex shapes or images on the display that are not supported by the standard primitives. In such cases, you can take full control of the display and create any image you want on the host device. You can then send that frame to the target device to be immediately rendered. This approach works well if you want to render and animate complex 3D objects or even games.
Manual Framebuffer
We know that internal drawing functions render to internal memory and only a call to Show() will transfer that data (framebuffer) to the display. We will make our own framebuffer. The size of the buffer is 4 bytes per pixel, sorted as ABGR. The pixel count is 128×64 on B&W display or 160×120 on color displays.
Python
width=128
height=64
frameBuffer = [0] * (width*height*4)
C#
var width=128;
var height=64;
var frameBuffer = new byte[width* height* 4];
JS
let width = 128;
let height = 64;
let frameBuffer = new Uint8Array(160 * 120 * 4);
This is a linear array, not a 2D array as you see on the display. Still, the size is correct, 128×64 pixels. We now need a helper function to let us set pixels in the framebuffer.
Python
def SetPixel(x, y, color):
    if x < 0 or x > (width-1) or y < 0 or y > (height-1):
        return

    index = (y * width+ x) * 4
    frameBuffer[index] = (color >> 16) & 0xff   # Red
    frameBuffer[index+1] = (color >> 8) & 0xff  # Green
    frameBuffer[index+2] = color & 0xff         # Blue
C#
void SetPixel(int x, int y, uint color){
    if (x < 0 || x > (width-1)|| y < 0 || y > (height-1))
        return;

    var index = (y * width+ x) * 4;
    frameBuffer[index] = (byte)((color >> 16) & 0xff);      // Red
    frameBuffer[index + 1] = (byte)((color >> 8) & 0xff);   // Green
    frameBuffer[index + 2] = (byte)(color & 0xff);          // Blue
}
JS
function setPixel(x, y, color) {
    if (x < 0 || x > (width-1) || y < 0 || y > (height-1))
        return;

    var index = (y * width + x) * 4;
    frameBuffer[index] = (color >> 16) & 0xff;      // Red
    frameBuffer[index + 1] = (color >> 8) & 0xff;   // Green
    frameBuffer[index + 2] = color & 0xff;          // Blue
    return;
}
Let us also add a function to clear the screen. Note how we are making functions identical to the ones we use with the built-in graphics.
Python
def Clear(color):
    for x in range(width):
        for y in range (height):
            SetPixel(x,y,color)
C#
void Clear(uint color){
  for(var x=0;x<width;x++){
      for(var y=0;y<height;y++){
        SetPixel(x,y,color);
  }
}
JS
function Clear(color){
  for(var x=0;x<width;x++){
      for(var y=0;y<height;y++){
        SetPixel(x, y, color);
  }
}
The only thing left is the Show() function, which transfers the data to the display. The DrawBuffer’s second argument is for ColorDepth, which must be 1 for B&W displays or 4,8,16 for color displays.
Python
def Show():
    BrainPad.Display.DrawBuffer(frameBuffer, 1)
C#
void Show(){
BrainPad.Display.DrawBuffer(frameBuffer, 1);
}
JS
async function Show()
 {
    await BrainPad.Display.DrawBufferBytes(frameBuffer,1);
}
Drawing can now be done just like we did before but now the PC is drawing.
Python
Clear(0)
SetPixel(1, 10, 10)
Show()
C#
Clear(0);
SetPixel(1, 10, 10);
Show();
JS
Clear(0);
SetPixel(1, 10, 10);
await Show();
The results are very similar to using the internal graphics. However, using the PC’s processing power will be much faster. This code will draw random pixels around the screen. The PC can draw thousands/millions of pixels per second the update looks slow on the screen because it takes time to transfer the framebuffer from the PC to the BrainPad. When generating images, 3D, video, and more, you will be generating the entire frame on the PC and transfer to the BrainPad after.
Python
width=128
height=64
frameBuffer = [0] * (width*height*4)

def SetPixel(x, y, color):
    if x < 0 or x > (width-1) or y < 0 or y > (height-1):
        return

    index = (y * width+ x) * 4
    frameBuffer[index] = (color >> 16) & 0xff   # Red
    frameBuffer[index+1] = (color >> 8) & 0xff  # Green
    frameBuffer[index+2] = color & 0xff         # Blue


def Clear(color):
    for x in range(width):
        for y in range (height):
            SetPixel(x,y,color)

def Show():
    BrainPad.Display.DrawBuffer(frameBuffer, 1)

import random
Clear(0)
while True:
    x = random.randint(0,width)
    y = random.randint(0,height)
    SetPixel(1, x, y)
    Show()
C#
var width=128;
var height=64;
var rnd = new System.Random();
var frameBuffer = new byte[width* height* 4];

void SetPixel(int x, int y, uint color)
{
    if (x < 0 || x > (width-1)|| y < 0 || y > (height-1))
        return;

    var index = (y * width+ x) * 4;
    frameBuffer[index] = (byte)((color >> 16) & 0xff);      // Red
    frameBuffer[index + 1] = (byte)((color >> 8) & 0xff);   // Green
    frameBuffer[index + 2] = (byte)(color & 0xff);          // Blue
}

void Clear(uint color){
  for(var x=0;x<width;x++){
      for(var y=0;y<height;y++){
        SetPixel(x, y, color);
  }
}

void Show()
{
    BrainPad.Display.DrawBuffer(frameBuffer, 1);
}

Clear(0);
while(true){
    var x = rnd.Next(width);
    var y = rnd.Next(height);
    SetPixel(1, x, y);
    Show();
}
JS
let BrainPad = new due.DUELinkController(new SerialUSB());
await BrainPad.Connect();
let width = 128;
let height = 64;
let frameBuffer = new Uint8Array(width* height* 4);

function setPixel(x, y, color) {
    if (x < 0 || x > (width-1) || y < 0 || y > (height-1) )
        return;

    var index = (y * width + x) * 4;
    frameBuffer[index] = (color >> 16) & 0xff;      // Red
    frameBuffer[index + 1] = (color >> 8) & 0xff;   // Green
    frameBuffer[index + 2] = color & 0xff;          // Blue
}

function Clear(color){
  for(var x=0;x<width;x++){
      for(var y=0;y<height;y++){
        SetPixel(x, y, color);
  }
}

async function Show()
{
    await BrainPad.Display.DrawBufferBytes(frameBuffer, 1);
}

Clear(0);
while(true){
    var x = Math.random()*127;
    var y = Math.random()*63;
    SetPixel(200, x, y);
    await Show();
}
Do you know how to draw circles? Lines? Use the SetPixel() method to add them.
Using PC’s Graphics
The previous work got the bases ready for the user to implement their drawing functions. We however can use the graphics implementation found on the system being used. This highly depends on what system and what libraries are being used. We will share an example of Python using the Python Imaging Library and another one using .NET C#.
Python
To use the Python Imaging Library, first import it into the Python system pip install Pillow. We now can create the needed drawing object to help with drawing shapes. This is a very powerful library with a lot of options. We are only showing very little of what it can do for demonstration purposes.
This is a B&W example for the 128×64 display. Note how for color, we used “white” or 1 to show a white pixel and “black” or 0 to clear out the pixel.
from DUELink.DUELinkController import DUELinkController
# Connect to BrainPad
availablePort = DUELinkController.GetConnectionPort()
BrainPad = DUELinkController(availablePort)
# BrainPad is ready
from PIL import Image, ImageDraw, ImageFont
framebuffer =Image.new("1", (128, 64), "black")
draw = ImageDraw.Draw(framebuffer)
# Draw something
draw.rectangle((10, 10, 20, 30), outline=1)
draw.point([0,0],fill="white")
font = ImageFont.load_default()
# Draw Some Text
draw.text(
(30,30),
text = "Hello Python!",
font=font,
fill=1,
)
# Get the pixel data as a flat array of values
pixels = framebuffer.tobytes()
# Send to the BrainPad's display
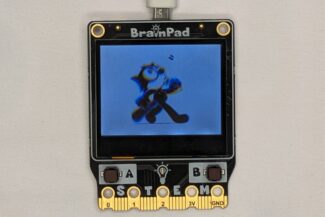
BrainPad.Display.DrawBuffer(pixels,1)We can load images on supported 160×120 color displays as well. The image can be transferred to 4BPP, 8BPP, or 16BPP.
from DUELink.DUELinkController import DUELinkController
from PIL import Image, ImageDraw, ImageFont

# Connect to BrainPad
availablePort = DUELinkController.GetConnectionPort()
BrainPad = DUELinkController(availablePort)
# BrainPad is ready

framebuffer = Image.open("Flower.png").convert("RGBA")

framebuffer = framebuffer.resize((160,120))

# Get the pixel data as a flat array of values
pixels = framebuffer.tobytes()

BrainPad.Display.PaletteFromBuffer(pixels) #only needed for 4BPP

# Send to the BrainPad's display
BrainPad.Display.DrawBuffer(pixels, 4) #4BPP, try 16 as well
.NET C#
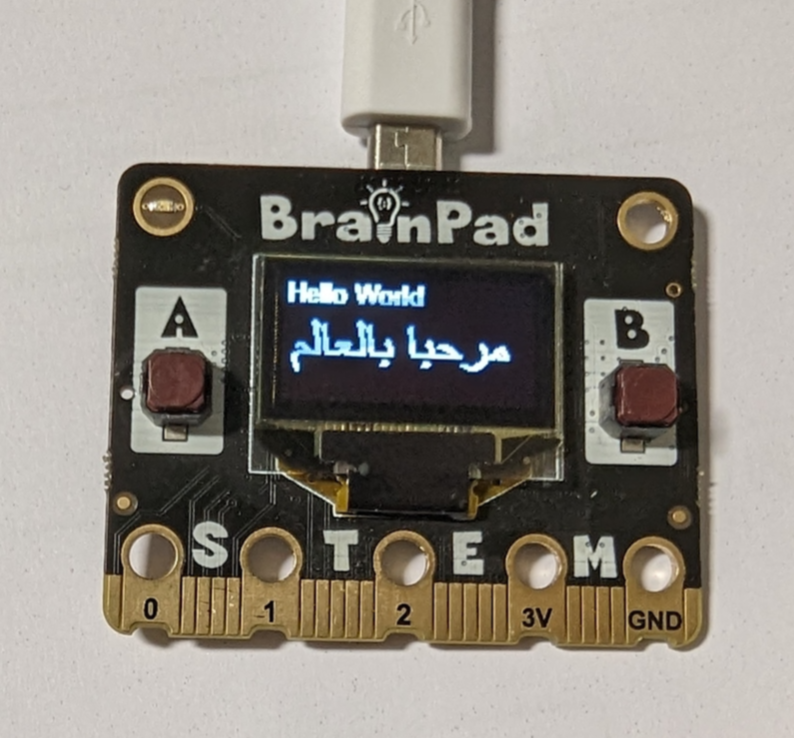
.NET C# also includes a powerful graphical library. Install System.Drawing.Common NuGet. An exciting use of this library is in the full font support. You can now write text on the screen in any language! If your PC can show it, then the BrainPad can as well.
This is an example of B&W displays.
using GHIElectronics.DUELink;
using System.Drawing;

var availablePort = DUELinkController.GetConnectionPort();
var BrainPad = new DUELinkController(availablePort);

var bmp = new Bitmap(128, 64);
var dc = Graphics.FromImage(bmp);

Font fnt20 = new Font("Arial", 20, FontStyle.Regular);
Font fnt10 = new Font("Arial", 10, FontStyle.Regular);
dc.DrawString("Hello World", fnt10, Brushes.White, 0, 0);
dc.DrawString("مرحبا بالعالم", fnt20, Brushes.White, 0, 20);

// Build a DUE buffer from the image
var pixels = BrainPad.Display.BufferFrom(bmp);

// Render the image to the device
BrainPad.Display.DrawBuffer(pixels, 1);
We can load images on supported color displays as well. The image can be transferred to 4BPP, 8BPP, or 16BPP.
using GHIElectronics.DUELink;
using System.Drawing;

var availablePort = DUELinkController.GetConnectionPort();
var BrainPad = new DUELinkController(availablePort);

////////////
// Add your display's config here
////////////

// Load the image
var image = Image.FromFile("Flower.png");

// Build a DUE buffer from the image
var pixels = BrainPad.Display.BufferFrom(image);

// Create a palette based on the source image
BrainPad.Display.PaletteFromBuffer(pixels); //only needed for 4BPP

// Render the image to the device
BrainPad.Display.DrawBuffer(pixels, 4); //4BPP, try 16 as well
JavaScript
The previous work got the bases ready for the user to implement their own drawing functions. We however can use the graphics implementation found on the system being used. This highly depends on what system and what libraries are being used. In this demo, we are using the canvas library. This example uses the system’s font. This allows users to draw international fonts on the screen.
// Install the canvas library
// npm install canvas

import {SerialUSB} from './serialusb.js';
import * as due from './duelink.js';
import {createCanvas} from 'canvas';

let BrainPad = new due.DUELinkController(new SerialUSB());
await BrainPad.Connect();

const canvas = createCanvas(BrainPad.Display.Width, BrainPad.Display.Height)
const ctx = canvas.getContext('2d')

let x=10;
let y=15;
let dx=5;
let dy=4;

for(;;) {
    // Clear canvas
    ctx.fillStyle = 'black';
    ctx.fillRect(0, 0, 128, 64);

    // Write "Awesome!"
    ctx.fillStyle = 'white';
    ctx.font = '12px Arial'
    ctx.fillText('Awesome!', x, y)

    let pixelData = ctx.getImageData(0,0,128,64).data;
    await BrainPad.Display.DrawBuffer(pixelData);

    x+=dx;
    y+=dy;
    if (x < 0 || x > 63) dx = -dx;
    if (y < 0 || y > 63) dy = -dy;
}
We can load images on supported color displays as well. The image can be transferred to 4BPP, 8BPP, or 16BPP.
import {SerialUSB} from './serialusb.js';
import * as due from './duelink.js';
import { createCanvas, loadImage } from 'canvas';

let BrainPad = new due.DUELinkController(new SerialUSB());
await BrainPad.Connect();

const canvas = createCanvas(BrainPad.Display.Width, BrainPad.Display.Height);
const ctx = canvas.getContext('2d');
const img = await loadImage("Flower.png");

ctx.drawImage(img, 0, 0, canvas.width, canvas.height);
let pixels = ctx.getImageData(0, 0, canvas.width, canvas.height).data;
await BrainPad.Display.PaletteFromBuffer(pixels); //only needed for 4BPP
await BrainPad.Display.DrawBuffer(pixels, 4); //4BPP, try 16 as well

//close serial com
await BrainPad.Disconnect()
What’s Next?
Do you have experience with drawing on computers? Build a 3D drawing on the screen.
BrainStorm
Graphics have always been a challenge to computers’ processing power. We have gone from Pong games in the 70s to having real-life-looking graphics in a few decades. The BrainPad takes you back to the 70s and brings you on a journey to see how pixels evolved into shapes, from fake-3D to real 3D and beyond!